Part 2: Async Ingestion, Cognito & Asset Optimization
Code and Architecture
As most tend to do with full-stack web apps, I started by building the base website and the login page, with a simple form to capture the username and password and send back a session token. Very simple and straightforward, but I realised that AWS has a service for this and recalled that it has a generous free tier.
AWS Cognito Userpools has a free tier of 10,000 monthly active users (MAU) at the time of writing
I noticed that rebuilding common services from scratch was going to be a productivity drain, and as an independent developer, moving fast initially is better as my time is a limited resource. This extra time allows me to instead build my app features and integrations into AWS.
AWS has created a seamless way which moves the burden of security onto them, where they serve many major corporations with the same battle-tested services. For this reason, I tore out the old login endpoints and created new ones which interact directly with AWS Cognito for login. Using AWS Cognito required the implementation of the standard OAuth2 authorisation code flow in conjunction with the Cognito hosted UI for a seamless user experience.
As this app will rely on the HEVY api initially, the login process would also require the user's API key from their HEVY account. This isn't the most ideal solution but currently, the only one. The API keys are encrypted with a key stored in AWS SSM Parameter Store.
Once the API key is stored in the database, the server will then synchronously call the HEVY API to collect all the user's data; however, I noticed a major red flag at this point. When this would happen, the user's browser would hang and depending on the amount of data the user had accumulated, this could easily take 15 - 20 seconds of just waiting, and that's for a single user. As a temporary fix, I had incorporated a multi-request technique in which first the server would request how far the pagination extended. Then fire up a couple of goroutines ( which is dependent on the machine's capabilities ) and start calling each page. The order of the requests didn't matter in this case, as the data was independent of each other and just data points in time.
From this learning point, I decided to make Asynchronocity a primary concern of the app and all the mathematical and long standing tasks to be handled by a worker group.
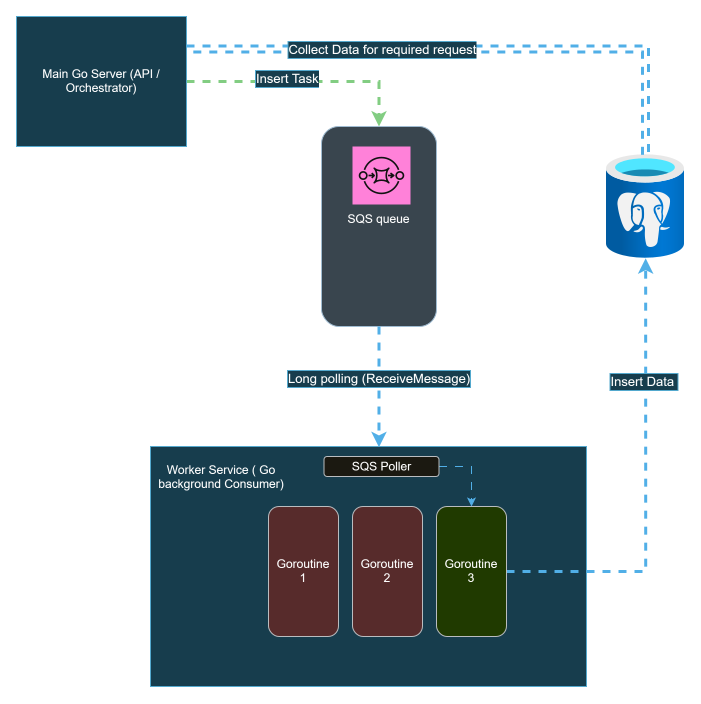
Above is the architecture of the worker service; it will be a separate Go server which polls for tasks from an SQS queue. It will then process those tasks and save the resulting data back to postgres in which the core server can then pickup the processed data and show the user. This is commonly known as the worker queue pattern.
This service was designed to make this app asynchronous, which should result in improved perceived performance for the user. All future requests, such as a request to process a user's new data, update usernames, etc will all be passed as asynchronous tasks to the SQS queue to be handled when possible.
As a cost-cutting measure, the SQS poller had an added sleep time if the SQS queue comes back as empty multiple times up to a maximum of 5 minutes. The max wait time allocated by SQS long polling is 20 seconds; however, since I already knew I would have low traffic to begin with, I had originally thought to cut down on unnecessary requests to push the SQS poller to wait for 5 minutes. I then later retracted that change because running the long poller at 20 seconds would mean 3 calls a minute, which would result in 130,000 calls a month. That figure is well below the 1 million free requests per month.
Stemming from the decision to make this app reliant on asynchronous calls, we would need to indicate to the user when a transaction is still pending, for example, processing of their last workout. For this, I will be implementing a mutex-like system, which is a global way to lock off a user's account from further changes if a change is still running, and this same lock will provide the indicator to the UI to show if there are updates running on said account. This lock is a Redis cache row status_{user_id} which will also have a TTL of 30 seconds so the account isn't locked forever if a task fails for any reason.
Once the login and landing pages were created, I decided to finally create the logo and come up with theming and branding for the page. I decided to call it RAVN based on Huginn and Muninn, who were Odin's eyes and ears, which is what I wanted this app to be for weight training.

Once I had the static files for the website, I needed a way to serve them. The easiest way would be to store the images on the Next.js container, allowing it to serve the images. This is suboptimal as my intention was to keep this app lean and fast, and storing the files on the server would mean reduced caching abilities.
The logical option was to create an S3 bucket for the static files, which was not publicly accessible. But with a bucket policy, it is accessible with CloudFront, which now enables the CDN to cache and deliver the content faster and keeps my services lean. All the Next.js instance needed to do was point to the location of these publicly accessible files, reducing the load on itself.
Another optimisation to improve performance was to compress the images and convert them to WebP to make them more efficient to serve on web browsers. A more important decision was to utilise the free flat tier provided by CloudFront.
Read more about AWS Cloudfront free flat tier here on my other post
Next up in Part 3: Going to Production, Configuration & Security →
Comments ()